

The 2010 MS Walk
It’s almost time.
I try to participate in the MS Walk every year, in honor of my mother. It’s a cause that matters greatly to me. And I would love your help.
This year I’m hoping to raise at least $1,000. If all 328 of my Blogger followers gave just $4 that would be more than enough. See? Even small donations can make a big difference! So, if you’re able, please consider sponsoring me. Not able to donate? That’s OK. You can still help me out by blogging, tweeting, and sharing on Facebook. Any help at all will mean a lot to me, and to the MS Society.
I’m sure you’ll be hearing from me about the MS Walk a few more times between now and the date of my local walk. Consider this a “kick-off” post.
And, just FYI, I will make a blog signature for anyone who donates $10 dollars or more and provides a valid e-mail address in their online donation form. You’ll have to select the “name and amount” option to receive your free signature. Or, if you donate $15 dollars or more you can choose between a free signature or one month of advertising space on Domestic Dork {provide an e-mail address and select “name and amount”}. And everyone who donates {again, you’ll need to provide an e-mail address in the form”} has the option of being added to an “Honor Blog Roll.” The blog roll will be left in my sidebar for 3 months and then left indefinitely on the blog page {see the “blogs” button in my menu on the left}.
Thanks for reading this, and thanks in advance and from the bottom of my heart for any donations and/or help spreading the word.

Thursday, April 29
DIY Baby Doll Sling Tutorial

featured on Craft Gossip
I got my sewing machine set back up the other day {it’s been faaaar too long since last I sewed – my machine is broken so it’s a frustrating experience}. But I wanted to make something, anything really. So I decided to whip up a simple baby doll pouch sling for Lucy. I checked online and did find some how-to guides for making pouch slings. But I was feeling lazy and wanted something really easy. I didn’t want to have to adjust the measurements or do quite so many steps {even if it would make a nicer sling}. So I improvised.

At some point in the future I’ll probably make a nicer one {maybe once I have a working machine}. But in the meantime this gets the job done. And just in case you’re a lazy sewer too I present:
STEP ONE

First pick out your fabric. I just grabbed some from my fabric box. I estimated how long to cut it by wrapping it around Lucy {from hip to shoulder and back down to hip} but you could measure your child if you want. Then cut it longer than you think you need it to be. I cut mine about 6 inches wide. But just do what you think looks best for your kiddo.
STEP TWO

Hem the long edges of your fabric strip. Make sure to fold over the right side {the pretty side of the fabric} and hem onto the wrong side {the back side, or ugly side of the fabric}. If you do it the opposite way the hemming seams will be on the outside of the doll sling and that won’t look nice.
STEP THREE

Fold the strip in half lengthwise making sure the wrong side is facing out.
STEP FOUR
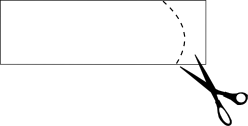
Sew the open ends together with a curved line. Then cut off the edges following the curve you’ve just sewn. In the above image the fold is to the left and the dotted line is what you’ll sew.
STEP FIVE

Turn the sling right side out again and try it on your kiddo. If it fits, great! You’re all done. If it’s too big {and it probably will be because you cut it too long on purpose – better too big than too small!} then turn it wrong side out again and sew another curve next to the original curved seam. Then cut off the excess. Repeat until you’re happy with the fit.
See? Easy peasy! Just a few cuts, and a few lines of simple stitching. Enjoy! And if you make one of your own I’d love to see pictures so link ‘em in the comments!By the way, these instructions are NOT suitable for a real baby carrier. Dolls only!

Tuesday, April 27
Final Wilton Class Cake
Alas, my Wilton cake decorating class has come to an end. For our final cake we tackled the “Wilton Rose.” They’re kind of fun actually, you know…when you don’t want to chuck your frosting bag across the room because you can’t get the petals just right. Anyhow, after getting all my roses on the rest of the cake just looked so empty so I did a tribute to one of my favorite Cake Wrecks.

I have to admit, I totally cheated on this cake. We were supposed to do a shell and sweet pea border instead of a star border. But you know what? I hate shells. And I hadn’t had a chance to practice them since last class. So, as my table-mate in class put it, I was a “rebel.” Because there’s nothing like using the wrong border to really stick it to the man! Viva la cake revolution!
*ahem*
Anyhow…the roses…here they are.

 My best one ended up buried on the bottom of the pile, so I did one more and it ended up being better than the one that got covered up. But then it got a little smooshed by the lid of my cake carrier. That’s it to the left. I’m not sure if you’ll be able to see the smooshage or not. Adam and our friend Liz didn’t seem to notice. So it’s all good. And here are a few more shots, just because I feel like it:


 I finally figured out why I was getting so many little craters in my base coat of icing. And by “figured out” I mean I asked the teacher. Turns out I was over-mixing my icing. So this time my base coat turned out much better. I went with an orange vanilla cake this time. It was OK. I think chocolate will always be my favorite {though the key lime cake we had at Lucy’s birthday and funfetti cake are yummy too}.
Anyway, I really, really enjoyed the class. And if supplies didn’t cost so freakin’ much I’d be signed up for the next course already. But for now, it will have to wait. In the mean time I have a LOT of leftover frosting with which I can practice those lovely roses and stupid shells.
What’s you favorite flavor of cake? Tell me in the comments.


I have to admit, I totally cheated on this cake. We were supposed to do a shell and sweet pea border instead of a star border. But you know what? I hate shells. And I hadn’t had a chance to practice them since last class. So, as my table-mate in class put it, I was a “rebel.” Because there’s nothing like using the wrong border to really stick it to the man! Viva la cake revolution!
*ahem*
Anyhow…the roses…here they are.

 My best one ended up buried on the bottom of the pile, so I did one more and it ended up being better than the one that got covered up. But then it got a little smooshed by the lid of my cake carrier. That’s it to the left. I’m not sure if you’ll be able to see the smooshage or not. Adam and our friend Liz didn’t seem to notice. So it’s all good. And here are a few more shots, just because I feel like it:

 I finally figured out why I was getting so many little craters in my base coat of icing. And by “figured out” I mean I asked the teacher. Turns out I was over-mixing my icing. So this time my base coat turned out much better. I went with an orange vanilla cake this time. It was OK. I think chocolate will always be my favorite {though the key lime cake we had at Lucy’s birthday and funfetti cake are yummy too}.
Anyway, I really, really enjoyed the class. And if supplies didn’t cost so freakin’ much I’d be signed up for the next course already. But for now, it will have to wait. In the mean time I have a LOT of leftover frosting with which I can practice those lovely roses and stupid shells.
What’s you favorite flavor of cake? Tell me in the comments.
Friday, April 23
Giveaway: Toy Mailbox!
Well, I promised a giveaway and here it is! CSN Stores is sponsoring this one. I especially love their toys and games site. They also have a furniture web store with some more great stuff for little ones like kid bedding and kid furniture. I was approached to do a review/giveaway and given the chance to browse the store for an item I’d like to review. The hardest part was choosing just one item. The pretend play items on their toy site are awesome {the play kitchen items, like the toy stand mixers, are adorable}! But, in the end, I chose this:

I even showed you how to make some cute pretend mail. I like this toy because
And now for your chance to win one!
Here are the rules {I’m keeping it simple this time}:
You must live in Canada or the US. And you must leave a comment on this post.
That’s pretty much it. Your comment can be about anything, how badly you want to win, what the weather is like where you are, whatever. I’m not picky. You can get one extra entry by blogging about the giveaway {leave a link to the POST, not to your blog homepage, in a separate comment to get the extra entry}.
I’ll use random.org to select a winner next week. I’ll close entries Friday morning and post the winner Friday afternoon {good way to kick off the weekend, no?}.
Good luck!


I even showed you how to make some cute pretend mail. I like this toy because
- It’s just small and adorable and
- It encourages pretend play.
And now for your chance to win one!
Here are the rules {I’m keeping it simple this time}:
You must live in Canada or the US. And you must leave a comment on this post.
That’s pretty much it. Your comment can be about anything, how badly you want to win, what the weather is like where you are, whatever. I’m not picky. You can get one extra entry by blogging about the giveaway {leave a link to the POST, not to your blog homepage, in a separate comment to get the extra entry}.
I’ll use random.org to select a winner next week. I’ll close entries Friday morning and post the winner Friday afternoon {good way to kick off the weekend, no?}.
Good luck!
PLEASE NOTE: You must be able to be contacted through your post {either by leaving your e-mail or by having your blog linked through your name}. Anonymous entries will not count.
Subscribe to:
Posts (Atom)


Sponsors


Alcohol & Drug Rehabilitation in FL Florida Treatment Centers
Popular Posts
-
Hello! You’re probably reading this for one of two reasons. You’re a regular reader and are quite used to my quirks or… You’ve been se...
-
GIVEAWAY NOW CLOSED I am obsessed. ManDork thinks I’m crazy. Maybe he’s right… But what can I say? I LOVE Mommy Necklaces . Because ...
-
You know those toilet bowl stains that just won’t go away? Oh, no? You never have that problem? Well then you are clearly on the wrong blo...
-
Did you know I’m an actress? Well, I am. I started doing musical theatre when I was just a little kid. I love being on the stage. But I also...
-
Being the kind of mama who uses cloth diapers and cloth menstrual pads I naturally planned on using cloth nursing pads. But my leakage level...
-
ETA: The MckLinky widget is now up! Link up your posts about what you sent and/or received for the exchange. Make sure to link to the post a...
-
I am pleased to announce the opening of Coffee Graphic Design ! I’ve been making art and doing graphic design for years. My first gra...
-
{not for the easily grossed-out} My house is not the only thing I have a hard time keeping clean. My ears’ wax factories have been produc...
-
This contest is now closed. Congrats to Lisa and Andrea! ETA: "Open to Canadians only" means open to Canadian residents only. Also...
-
I know Valentine’s Day is still more than a month away. But in the age of online shopping it’s good to start early to account for shipping t...


Blogroll


